Correcting Print-Quality Problems
Often print- quality problems can be handled easily by making sure that the printer is properly maintained, using print media that meets HP specifications, or running a cleaning page.
This section helps you define print-quality problems and what to do to correct them.
Often print- quality problems can be handled easily by making sure that the printer is properly maintained, using print media that meets HP specifications, or running a cleaning page.
Many times I have gotten a call from a customer that had poor print quality. Usually my first question is, Have you changed the cartridge?
This is very important because no one wants to pay a technician to show up on-site to change a toner cartridge.
Many times a I've showed up on site and everyone thought someone else changed the cartridge when, really nobody changed the toner cartridge.
Sometimes something can be inside the printer. Labels can get stuck on the cartridge and fuser. Wipe out the cavity of the printer with a dry cloth. Make sure nothing is inside the printer.
Print-quality checklist
Print-quality checklist General print-quality problems can be solved by following the checklist below. Check the printer driver to make sure that you are using the best available print quality option. Try printing with one of the alternative printer drivers.
- Check the printer driver to make sure that you are using the best available print quality option.
- Clean the inside of the printer
- Check the paper type and quality
- Check to make sure that EconoMode is off in the software
- Troubleshoot general printing problems
- Install a new HP print cartridge, and then check the print quality again.
NOTE:
If the page is printing images darker than those from an older printer, and you want the images to match the older printer, make these changes in your printer driver: on the Finishing tab, select Print Quality , select Custom , click Details , and click the check box for Print Images Lighter
If the page is totally blank (all white) check to make sure that the sealing tape is removed from the print cartridge and ensure that the print cartridge is installed correctly.
Newer printers have been optimized to print characters more accurately. This might result in characters that look lighter or thinner than you are used to from your older printer.
Image defect examples
Use the examples in this image-defect table to determine which print-quality problem you are experiencing, and then see the corresponding reference pages to troubleshoot.
These examples identify the most common print-quality problems of a 4250/4350 printer. But can be used for all basic imaging problems.
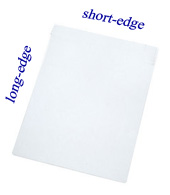
The examples below depict letter-size paper that has passed through the printer
short-edge first. Sections describing the image defect and possible remedies exist below the image table.
-
Make sure that the print cartridge is fully installed.
-
The toner level in the print cartridge might be low. Replace the print cartridge.
-
The media might not meet HP specifications (for example, the paper is too moist or too rough).
-
The printer might be due for maintenance. Check this by printing a copy of the supplies status page. If maintenance is due, order and install the printer maintenance kit. back to examples
-
Make sure that the print cartridge is fully installed.
-
Make sure that the EconoMode setting is turned off at the control panel and in the printer driver.
-
Open the Configure Device menu at the printer control panel. Open the Print Quality submenu and increase the TONER DENSITY setting.
-
Try using a different type of paper.
-
The print cartridge might be almost empty. Replace the print cartridge.
back to examples
-
Print a few more pages to see if the problem corrects itself.
-
Clean the inside of the printer and run a cleaning page to clean the fuser.
-
Try using a different type of paper.
-
Check the print cartridge for leaks. If the print cartridge is leaking, replace it.
back to examples


-
Make sure that the environmental specifications for the printer are being met.
-
If the paper is rough, and the toner easily rubs off, open the Configure Device menu at the printer control panel. Open the Print Quality submenu, select FUSER MODES , and then select the paper type you are using. Change the setting to HIGH 1 or HIGH 2, which helps the toner fuse more completely onto the paper.
-
Try using a smoother paper. back to examples
-
Print a few more pages to see if the problem corrects itself.
-
Clean the inside of the printer and run a cleaning page to clean the fuser.
-
Replace the print cartridge.
-
The printer might be due for maintenance. Check this by printing a copy of the supplies status page. If maintenance is due, order and install the printer maintenance kit. back to examples
-
Do not use paper that has already been run through the printer.
-
Try using a different type of paper.
-
Print a few more pages to see if the problem corrects itself.
-
Turn over the stack of paper in the tray. Also, try rotating the paper 180°.
-
Open the Configure Device menu at the printer control panel. On the Print Quality submenu, increase the TONER DENSITY setting.
-
Make sure that the environmental specifications for the printer are being met.
-
Replace the print cartridge. back to examples
-
Print a few more pages to see if the problem corrects itself.
-
Try using a different type of paper.
-
Make sure that the environmental specifications for the printer are being met.
-
Clean the inside of the printer and run a cleaning page to clean the fuser.
-
The printer might be due for maintenance. Check this by printing a copy of the supplies status page. If maintenance is due, order and install the printer maintenance kit.
-
Replace the print cartridge back to examples
-
If paper is heavy or rough, open the Configure Device menu at the printer control panel. On the Print Quality submenu, select FUSER MODES , and then select the paper type you are using. Change the setting to HIGH 1 or HIGH 2, which helps the toner fuse more completely onto the paper. (See Print Quality submenu .) You must also set the type of paper for the tray you are using.
-
If you have observed a rougher texture on one side of your paper, try printing on the smoother side.
-
Make sure that the environmental specifications for the printer are being met.
-
Make sure that type and quality of the paper you are using meet HP specifications.
-
The printer might be due for maintenance. Check this by printing a copy of the supplies status page. If maintenance is due, order and install the printer maintenance kit. back to examples
-
Print a few more pages to see if the problem corrects itself.
-
If the distance between defects is 38 mm (1.5 inches), 55 mm (2.2 inches), or 94 mm (3.7 inches), the print cartridge might need to be replaced.
-
Clean the inside of the printer and run a cleaning page to clean the fuser.
-
The printer might be due for maintenance. Check this by printing a copy of the supplies status page. If maintenance is due, order and install the printer maintenance kit. back to examples
-
Print a few more pages to see if the problem corrects itself.
-
Make sure that type and quality of the paper you are using meet HP specifications.
-
The printer might be due for maintenance. Check this by printing a copy of the supplies status page. If maintenance is due, order and install the printer maintenance kit.
-
If the distance between defects is 38 mm (1.5 inches), 55 mm (2.2 inches), or 94 mm (3.7 inches), the print cartridge might need to be replaced. back to examples
-
Print a few more pages to see if the problem corrects itself.
-
Make sure that the environmental specifications for the printer are being met.
-
The printer might be due for maintenance. Check this by printing a copy of the supplies status page. If maintenance is due, order and install the printer maintenance kit. back to examples
-
Print a few more pages to see if the problem corrects itself.
-
Verify that there are no torn pieces of paper inside the printer.
-
Make sure that paper is loaded correctly and that all adjustments have been made. Make sure that the guides in the tray are not too tight or too loose against the paper.
-
Turn over the stack of paper in the tray. Also, try rotating the paper 180°.
-
Make sure that the type and quality of the paper you are using meet HP specifications.
-
Make sure that the environmental specifications for the printer are being met.
back to examples

-
Turn over the stack of paper in the tray. Also, try rotating the paper 180°.
-
Make sure that the type and quality of the paper you are using meet HP specifications.
-
Make sure that the environmental specifications for the printer are being met.
-
Try printing to a different output bin.
-
If paper is lightweight and smooth, open the Configure Device menu at the printer control panel. On the Print Quality submenu, select FUSER MODES , and then select the paper type you are using. Change the setting to LOW , which helps reduce the heat in the fusing process. You must also set the type of paper for the tray you are using. back to examples
-
Print a few more pages to see if the problem corrects itself.
-
Make sure that the environmental specifications for the printer are being met.
-
Turn over the stack of paper in the tray. Also, try rotating the paper 180°.
-
Make sure that paper is loaded correctly and all adjustments have been made.
-
Make sure that the type and quality of the paper you are using meet HP specifications.
-
If envelopes are creasing, try storing envelopes so that they lie flat.
back to examples

-
Print a few more pages to see if the problem corrects itself.
-
Make sure that the type and quality of the paper you are using meet HP specifications.
-
Replace the print cartridge. back to examples
-
1.Replace the print cartridge.
-
2.Reduce the number of pages that you print with very low toner coverage.
back to examples

-
Print a few more pages to see if the problem corrects itself.
-
Make sure that the type and quality of the paper you are using meet HP specifications.
-
Make sure that the environmental specifications for the printer are being met.
-
Replace the print cartridge. back to examples
-
Make sure that the type and quality of the paper you are using meet HP specifications.
-
Make sure that the environmental specifications for the printer are being met.
-
Turn over the stack of paper in the tray. Also, try rotating the paper 180°.
-
Open the Configure Device menu at the printer control panel. Open the Print Quality submenu and change the TONER DENSITY setting.
-
Open the Configure Device menu at the printer control panel. On the Print Quality submenu, open OPTIMIZE and set LINE DETAIL=ON. back to examples

-
Make sure that the type and quality of the paper you are using meet HP specifications.
-
Make sure that the environmental specifications for the printer are being met.
-
Turn over the stack of paper in the tray. Also, try rotating the paper 180°.
-
Do not use paper that already has been run through the printer.
-
Decrease the toner density. Open the Configure Device menu at the printer control panel. Open the Print Quality submenu and change the TONER DENSITY setting.
-
Open the Configure Device menu at the printer control panel. On the Print Quality submenu, open OPTIMIZE and set HIGH TRANSFER=ON. back to examples
.gif)
.gif)
-
Change the tone (darkness) of the field that the repeated image appears in.
-
Change the order in which the images are printed. For example, have the lighter image at the top of the page, and the darker image farther down the page.
-
From your software application, rotate the whole page 180° to print the lighter image first.
-
If the defect occurs later in a print job, turn the printer power off for 10 minutes, and then turn the printer power on to restart the print job. back to examples
703-932-1110